Seasons Matter & Change How You Layer Clothing
How you choose to layer, or not layer, can make or break how much you LOVE (or end up hating) your next hike. The best way to prepare your layers for a hike or outdoor activity:
- Check the weather
- Use the checklist below to prepare your basics
- And always take extra layers to make that mountain summit incredible
Layering based on the immediate and future weather forecast is imperative to be comfortable on the trail. When you plan to go outside, skipping this step and not planning for the weather can make your day miserable! You’ll end up cold, sweaty, and in a horrible mood. To make sure you’re as prepared as possible, let’s see the basics that you’ll need to pack.
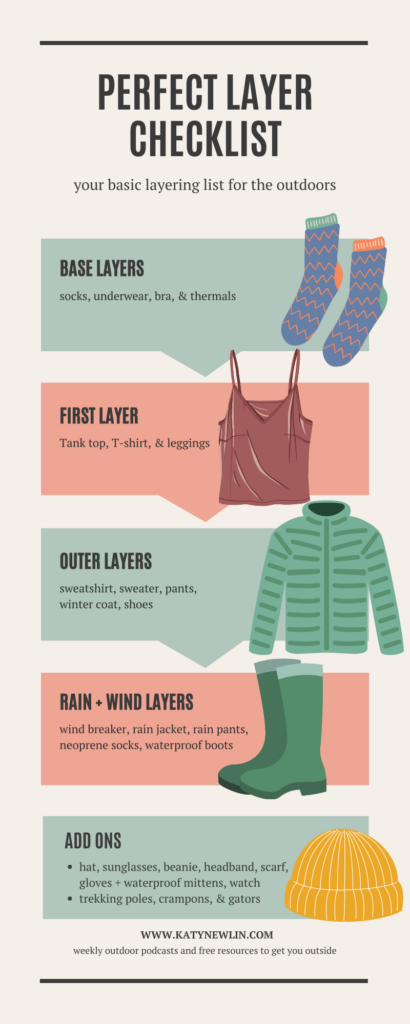
Pack Layers
This seems easy but takes some time to learn in real life. You’ll at least want to pack these basic essentials depending on where and what season you’re hiking during.
Baselayer
Like a SmartWool shirt, long sleeve or short depending on the season
Warm fleece or sweatshirt
Something with a zipper is nice to adjust your layer without removing a layer entirely
Buff + Scarf
Something for around your neck. Buffs are very versatile and are super easy to use for your ears or to take off entirely without stopping on the trail
Leggings + Thermals
A good base layer where you can layer with sweats or hiking pants, depending on what you have lying around
Socks
And another pair. (wear two pairs if you keep getting blisters on your feet; always pack an extra pair in a zip-lock bag to keep them dry and have as a back-up if your boots get wet)
Shoes
Pick the best ones for the trail that you’ll be hiking on. For instance, hiking with five fingers is amazing for a smooth path or an easy creek hike. Hiking in rock-free terrain with rolling hills is perfect for low-top boots or tennis shoes but when you venture into rocky terrain, investing in a pair of mids or highs is well worth it.
Outer Layer
You can take whatever you have. If you have the choice, a puffy coat is wonderful because they compress down to nothing and can easily be taken in a day pack. Also, bring a rain jacket or a garbage bag in case it decided to downpour. A garbage bag can also be used to line your backpack if you don’t have a pack rain cover.
Gloves
Taking two pairs of gloves is the best decision if you’re heading into cold weather. An amazing recommendation based on many years of biking and hiking in freezing weather is to take a pair of gloves accompanied by waterproof mittens to keep your hands warm at all times.
Beanie + Hat
Taking a beanie is something super important to do. Especially if you’re unsure about the weather conditions at the top of the hike. Or if you’re going to hike under the blazing sun, take a hat. And sunblock. Both are essential for making the next day bearable!
Additional Items
Sunscreen, bug spray, & bear spray are essential items depending on where you take to the trails. Taking these will change how happy you are on the trail, and your safety – in some cases. You can get by without, but you might regret it. Keep these essentials in your pack and just leave them there. You’ll be happy you did once you’re on the trail. Just make sure to balance what you bring with your overall pack weight – picking smaller bottles helps tremendously.
Check the Weather near Your Hiking Trail and Day of
Weather App
This can be as simple as using your phone’s weather app and looking at the hourly forecast but heed this warning (from personal experience) you’re going to want to search a bit deeper if you’re planning on summiting a 4000 footer in New England or going somewhere with a lot of elevation change. Conditions on the top of the mountain are dramatically, let me reemphasize – dramatically – different than on the ground.
Facebook Groups
To check for peak conditions, check out local FB groups for your specific hike or within that park’s local area so that you can ask in advance for photos or previous hiker advice, or check out the park’s website.
Park Web Cams
Frequently, each park will have a camera set up to view the peak conditions and will let you see the live view. Pretty cool! For example, see the current conditions at Crater Lake National Park in Oregon, USA! Crate lake NP contains some of the clearest water.
Download and Use this Basic Checklist for Your Trip
And explore more printable checklists from To The Trails. Head over there go download the entire Hiking Checklist Bundle. For free.
2 responses to “Episode 5: Perfect Hiking Layers for Outdoor Activities”
[…] my friend, have boxed yourself in. Embracing the outdoors in ALL conditions and learning how to layer properly opens up a whole new world of […]
[…] TrendingEpisode 5: Perfect Hiking Layers for Outdoor Activities […]